ClubRoadster.net banner

My NA becomes a track car (Build thread)

2 reading
678K views 2.7K replies 292 participants last post by  dbuilt  
#1 · (Edited)
**Prepare to see the worst paint condition you've ever seen on a miata. Just fair warning. Yes I’ll be getting it painted soon. **

I decided there's no time like the present to start doing what I've been dreaming of: time attack in Miata Challenge. Car stays street legal, and I drive it a lot, so there's still a need to balance track needs with street needs, but the car needed a few things to be properly ready for track abuse.

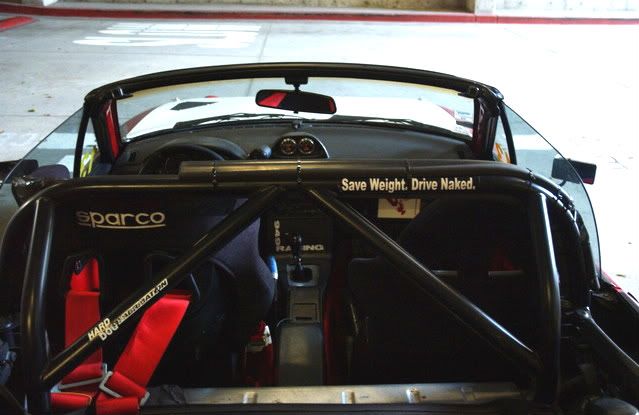
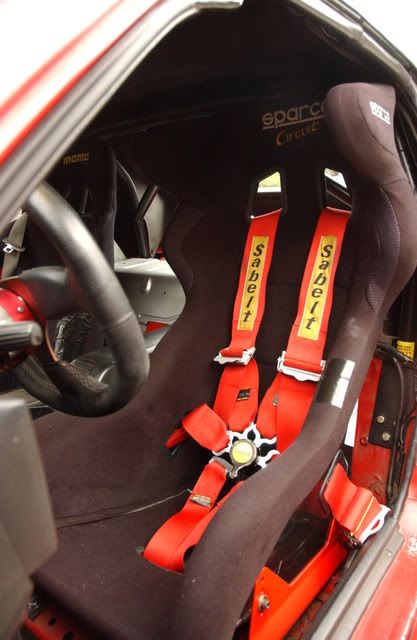
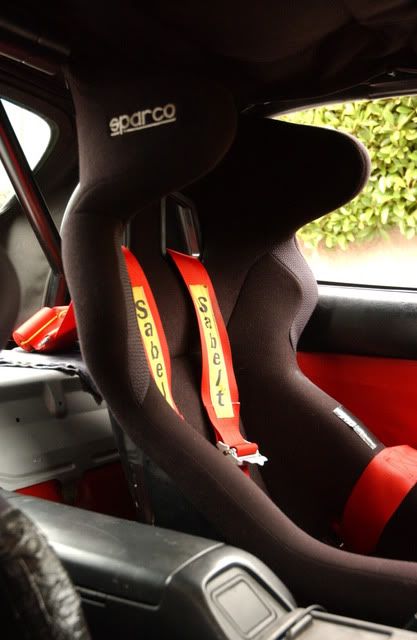
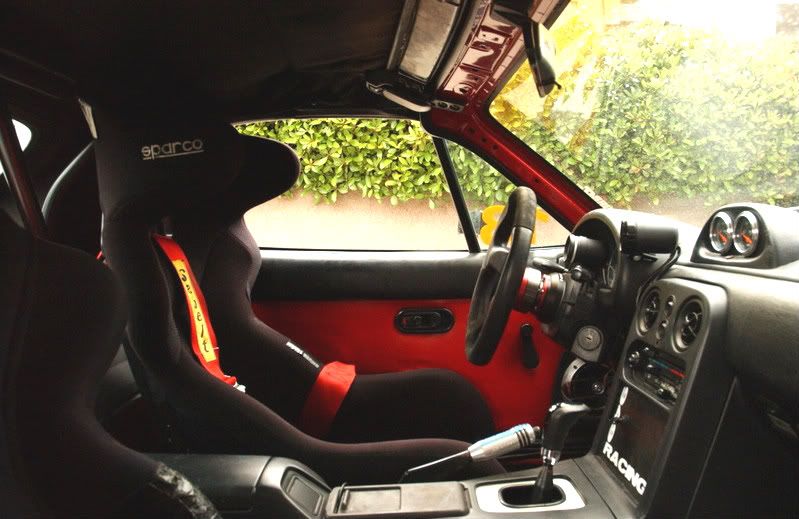
First off, needed a more serious driver's seat. Found a great deal on CL for a Sparco Circuit (FIA) with normal wear and tear. Mounting involved bolting the sidemount brackets to a modified Corbeau bracket, fixed position, no slider. This seat is a pain in the a** to fit due to the dimensions at the top, especially with a soft top, but I made it happen:
Image


Image


Image


Image


This made it possible to move my old driver’s seat – a Momo Start – to the passenger side for instructors. The Sparco is crazy tight and rigid, I literally feel bolted into the car in it, which is pretty cool. I paired a quick release hub with my NRG steering wheel about a year ago, never really used the quick release much, but now I am really relieved that I have it - getting in/out over the high sides of the Sparco Circuit is nearly impossible with the steering wheel in place.

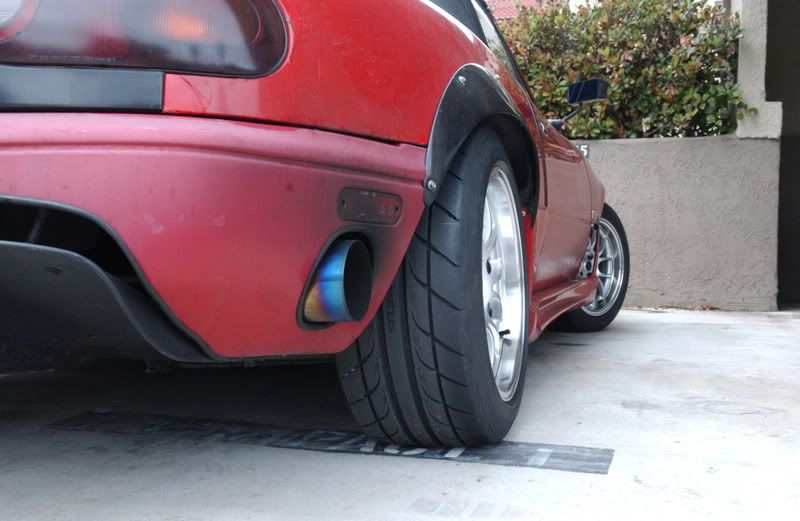
Next was the exhaust. My old setup was a 3” dump at the rear axle. It simply wouldn’t have any hope of passing sound at Laguna Seca. I had the turn down tip cut off and 3” mandrel pipe ran out to the back above the diffuser, exiting out the side of the rear bumper behind the wheel. The muffler has a removable silencer, which will be crucial for tracks with sound limits.
Old Exhaust:
Image

New Exhaust (will get to the wheels in a minute):
Image


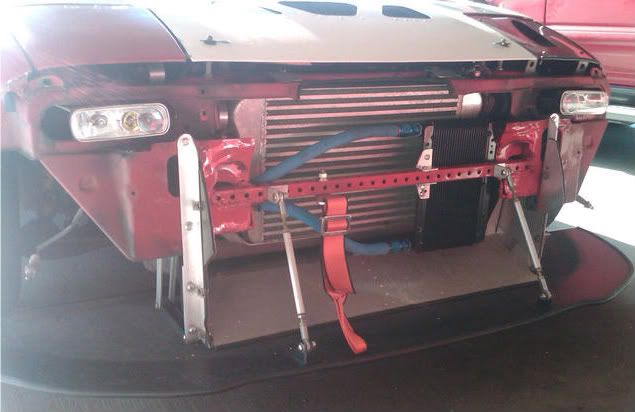
Oil cooler is basically a necessity for a turbo motor on the track. Mocal thermostat plate, FM sandwich plate spacer, push-lock fittings, aeroquip hose, Trucool oil cooler. While I was in there I added the tow strap from Saferacer. Still need to add a tow strap for the rear. Just took one quick crappy phone pic before putting the nose back on:
Image

Bumper on, tow strap hanging out:
Image


Found a guy on this forum who offered to trade me his Torsen for my Open diff + cash, so I scored a Torsen for $300. Along with that I got to swap my line for his SS brake and clutch lines for $50. Drove up to his place in Irvine and swapped it all on the side of the road:
Image


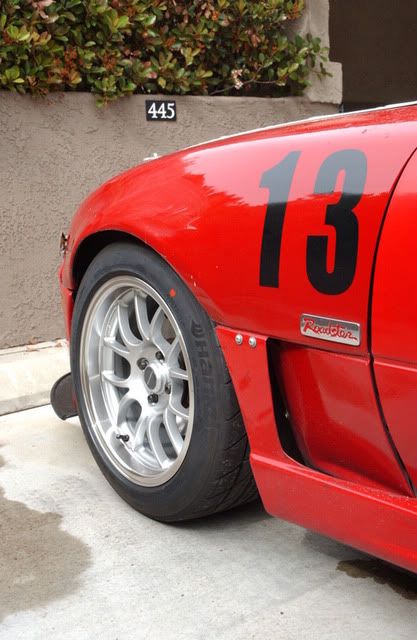
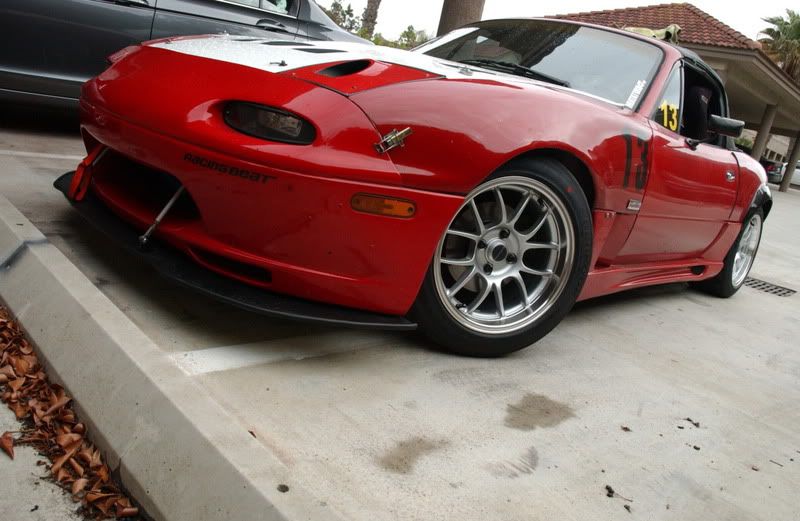
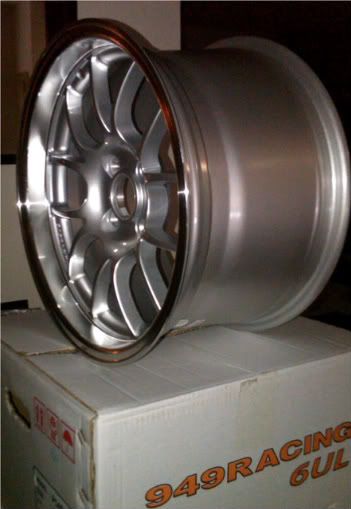
The big purchase was wheels and tires. Need a dedicated set for tracking (already have a street set and a autox set), and was tossing between the TR wheel or other cheap 15x8s, and then came across an amazing deal on CL for brand new, still in the box 15x9 6ULs for $600 with all eight 949 valve stems included. Could not pass it up. Paired them with Hankook RS-3's in the tried and true 225-45-15.
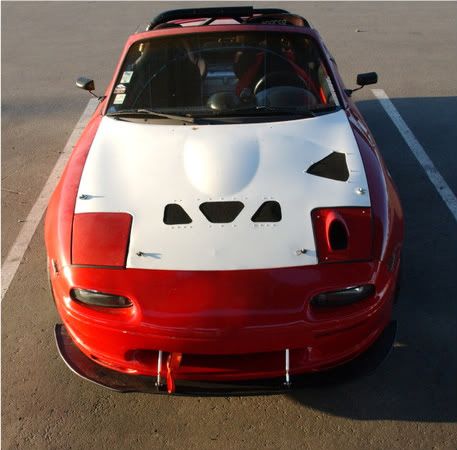
My rear fenders are flared and the front fenders are extremely pulled to fit my autox and street wheels. The result is whereast these 15x9's barely fit on most NAs, they actually look sunken in on my car, but that is great for aero, aesthetics aren't the priority here:
Image


Image


Image


Image


These are seriously meaty. Grip is ridonculous for a street tire. They make my Azenis feel like all seasons.
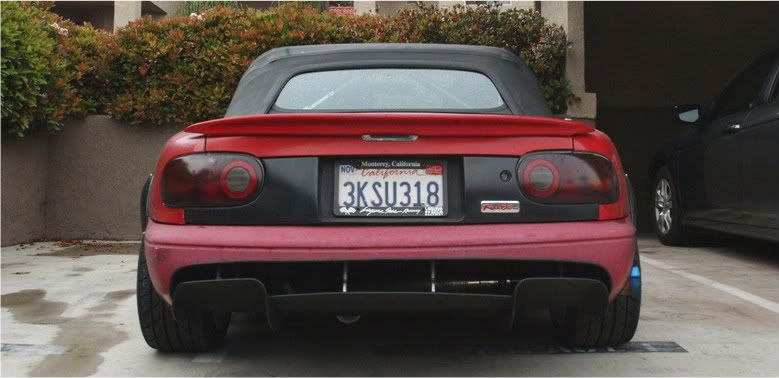
Rear view with the top up:
Image


Rear View, top down (I'll be running top down for MC - I'm maxed on points for Mod class, so hardtop is not an option, plus I prefer this for the fun factor) :
Image


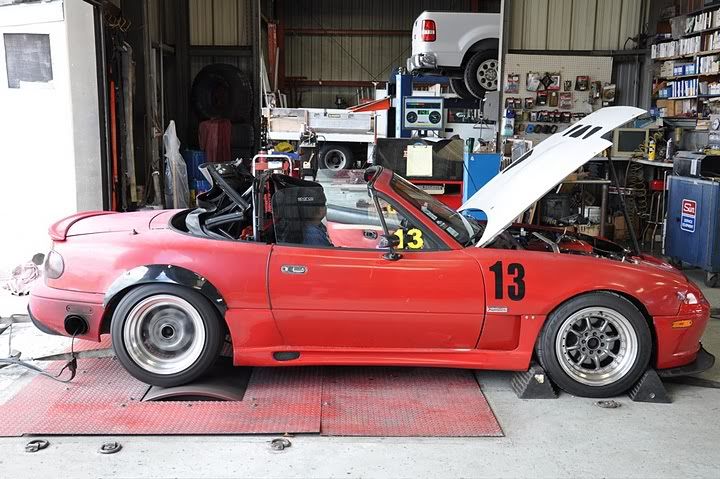
Last, attended a dyno day to do a little check up on the motor and make sure it's still strong. I also set up an in-car switch for high-boost and low-boost. I'll be running the low boost on track for engine longevity and maximum fun.
Almost two years ago I dyno'd at 206 whp / 179 ft-lbs. Boost hasn't been changed (10psi), but better exhaust now and new plugs/wires/PCV/etc. Put down 207 whp / 208 ft-lbs. Strong.
As for the low boost for track, I'm having trouble getting the turbo to spool at any lower than 7psi. I was hoping for 4.5-5 psi and ~150 whp, I'm not sure if the exhaust is too free-flowing, or what, but with the wastegate full loose it still holds at 7 psi, which put down 185 whp / 180 ft-lbs.
Image


That's about it. Car is pretty much ready to go for April 17th at Buttonwillow. Still need a tow strap on the rear, and I have to pull the rear diffuser off in order to fit under the 15.5 point limit for Mod class. I'd also like to try to get the low boost setting a bit lower.

-Ryan
 
#2,682 ·
(My last post left off with us prepping for SLB USA.)

Originally posted Monday Feb 18, 2019:

Superlap Battle USA 2019. We brought the HyperMiata to a power track to battle against 600, 700, and 800 hp cars. Day 1 we got down to a 2:23.4 and surprised a lot of people that we could be so fast with just 300hp. I am pretty sure we had the lowest hp in out of all 19 cars in Limited. The fact that we got protested in this field of monsters is both comical and a compliment. We're doing things right. Competitors are taking the Miata seriously, even at COTA.

After the Saturday night data and vid review we found a lot of areas where we could make improvements. Day 2 we had the setup dialed and I had all the places to find time on the track hammered into my brain. Unfortunately the transmission had an issue that ended our day early, but we’re coming away from COTA with a solid 5th place out of 19 cars!! It was an awesome event, amazing track, and we can’t wait to return next year.

I will have more to post soon, trying to clean up our Airbnb and get on the road this morning. Lots of miles to cover back to CA.

The cars ahead of us had no less than 650hp, and word is a couple were over 800. I'm curious to find more info on them. We learned a ton. We had more in it. We'll have to wait until next year to find it.

There have been tons of people reaching out on social media, forums, etc. following our efforts and I want to thank everyone for all the well wishes and support. It's been a truly epic weekend. I also can't thank my crew enough; Moti of Blackbird Fabworx, and Greg and my awesome girlfriend Bri, both of Goodwin Racing. The four of us were in constant motion and full attack mode all weekend. No way could I have done this without them. Here are a couple more pics grabbed from various locations for now, will have more soon.

Miata Is Always The Answer!

Image


Image


Image


Image


Me being awkward, no idea what to do with my hands!

Image


Image


Texas BBQ!

Image
 
#2,684 ·
Originally posted on Thursday Mar 07, 2019:

We're using our experience and data gathered from COTA to guide the development plans this year, with the primary focus being a return to COTA in 2020 with significant updates. Astonishing how much drag plays a role at this track, we're hitting a major wall on the straights. In some ways, the ideal COTA setup and even overall car approach is massively different than other tracks we frequent more often. It's a new challenge that puts us outside of our comfort zone. I'm quite excited.

 
#2,685 ·
Oiriginally posted Tuesday Jul 09, 2019:

Time to get cracking. Now with GTA Finals @ Buttonwillow in November followed by Superlap Battle at COTA in February, I'm*shifting to a winter-centric test/race schedule with a break in early summer. It's been refreshing, but it's time to get to work. Lots of stuff on the to-do list and time is going to start flying.

Before doing anything on the car itself, I had a side project to tackle. So far, removing the drivetrain required a lift;*drop the subframe onto a dolly and then lift the car up and off.*I wanted to be able to drop the assembly with the car sitting on jackstands, making it something I could do anywhere.*

Started with a Harbor Freight motorcycle lift. For stability I made four legs with casters on each end. The legs are removable so the lift can store easily. Then built a simple base on the lift that bolts to attachment points that I added to the V8R front subframe.*

Image


Image


Works like a dream. Can drop the assembly out of the chassis, roll it around the shop, lift it up to work on it easily, etc. It's stable even with the suspension and transmission attached.

Image


#2,688 ·
+1

Still amazed that this car started as a pretty basic turbo'd car and has developed into what it is now.
+1

Such a spectacular car, Ryan, you should be very proud at how far you have brought Hyper. :icon_cheers:
 
#2,691 ·
Hey, we're caught up now! Time for the latest updates :)

In Miata terms, we're making good power. But we're the underdog by a huge margin against the cars we compete with. No doubt, we make the most with what we have, but with the largest Time Attack event moving to Circuit of the Americas where horsepower reigns supreme, I knew we needed to turn the wick up. We'll always be down on power compared to the other guys, but that doesn't mean we can't give David a bigger rock against Goliath. However, save for some transmission hiccups, reliability has been one of our strengths and I did not want to sacrifice that. I had an idea.

This didn't happen overnight. I've been working on the solution all year in the background.

A year ago, I placed a Rotrex on a box beside my spare motor, and got started:

Image


The first time I took this C38-92 out of the box I realized the challenge I had ahead. I'm used to the C30 units used on Miatas, and had that size in my mind when I was initially looking at the space in the engine bay, placement, etc. The C38 is a behemoth. It would turn out that packaging would be one of the largest challenges at just about every step in this project.

In July I posted this teaser, focusing on the new rolling engine lift. Only a few people noticed the blower hanging on the side of the motor :wink:

Image


That was after months of work on the bracket, and the final is actually version 3 after scrapping two prior. That gets expensive when you're cutting 7000 series aluminum, but it has to be perfect. Clearances are mere millimeters everywhere, and rigidity of the bracket is critical to avoid having belt issues.

The frame rail had to be cut substantially and reshaped, with care taken to add new internal structure to ensure loads from the suspension are still transferred through the frame rail appropriately.

Image


The subframe also had to be cut. :shock:

Did the math on pulley sizes and picked a few final candidates to test. We will not be spinning the blower to its redline, no running on the ragged edge here. Then ordered lots of belts and worked out a suitable belt for every pulley:

Image


The packaging challenges continued with the coolers. I needed an intercooler and a cooler for the Rotrex fluid in addition to the engine oil cooler. I also wanted the shortest charge piping possible, made a bit more complicated with the throttle body at center top of the V6 rather than on the side of an I4. Off the shelf intercooler options weren't going to work, I was going to have to make it. I chose a Vibrant core with the right dimensions for what I had in mind:

Image


To hang everything in place I had to toss the old radiator mounts and make an entirely new frame to hold everything tightly together:

Image


Image


I’ve never made intercooler endtanks before. This project was going to give me a lot of practice on the TIG welder. Drew up and cut pieces to make up the endtank:

Image


The top tank took a while with a tube hand notched mid-bend to merge into the curved tank:

Image


Finished intercooler after quite a bit of welding.

Image


Welding the tanks to the core was a next-level learning experience; you’re welding a butt-joint with the core quadruple the thickness of the endtank, and the core by its nature is trying to suck all the heat out of the weld as you go. Rather proud of how it turned out.


New coolers in new locations meant making all new lines:

Image


Image


On to the intake, and more packaging challenges. I did the math on filter size for expected flow. The filter I had was big for a Miata. The new filter is massive:

Image


The intake tube for the C38-92 is 3.5” and that does not want to fit… anywhere.

Image


More fun welding:

Image


continued in next post...
 
#2,692 ·
In terms of sensor and component locations, there was some debate about what locations would work best. I made a couple different configurations for charge piping to try the options:

Image


Using a TiAL QRJ blowoff valve, configurable for either recirculating or vent to atmo. Which MAF sensor location we found worked best would determine which config we wanted, so I did both VTA and recirc setups:

Image


The recirculating config uses a hard line that was fun to bend:

Image


Image


The Rotrex points the air inlet straight back, directly at the downpipe. So inevitably, the silicone bend is riiiiight by the exhaust. To give the coupler the best darn shot at nice long life possible, both coupler and downpipe are wrapped, and then separated by a titanium shield with a reflective layer on the hot side:

Image


Crankcase ventilation becomes critical when adding boost. A direct injection engine really benefits from catch cans even naturally aspirated, so it had been on my to-do list for a while. Since this is a race car only I simplified things a bit. Eliminated the PCV, drilled out and tapped both valve covers, and ran lines to a pair of catch cans that vent to atmosphere. With so little space in the engine bay, I ended up placing the cans in the hole that the HVAC system pulls air from on a street car:

Image


The fuel side is tricky. Direct injection can’t be easily upgraded with aftermarket parts the way a traditional fuel injection setup can be. Expecting that we might find we need more fuel than we could flow on the stock system, I preemptively bought a high pressure pump from the Cadillac ATS-V (which runs the twin turbo LF4 engine), to see if the pump would swap in on the LFX:

Image


It is almost identical. The only difference is that the plunger is ~0.100” shorter.

Image


After some measuring we felt pretty sure that the lowest point on the cam lobe that drives the high pressure pump was tall enough to maintain contact with the LF4 pump so we swapped it in on the motor in the car. That is not a fun job. Think coolant reroute but with the engine even closer to the firewall and more stuff in the way.

Colder spark plugs were in order:

Image


It’s all a big paper weight without tuning. That is outside my wheelhouse, and I wanted someone who really knew their field and would give the car the time and attention it needed. For this I teamed up with UMS Tuning. I consulted with Tony through the final stages of the build to ensure everything was configured the way he felt would get us the best run at all things working smoothly. With everything done he made some tweaks to the calibrations of a few sensors on the old tune for startup. It fired first try and idled pretty well.

Image


Pulled it out of the shop, first time sun hit the car since February!

Image


Then loaded up for the 350 miles tow to Arizona to get tuned.

More to come...
 
#2,693 · (Edited)
Off to AZ to take the car to UMS Tuning. They weren't the closest option for me, but that wasn't my priority. I wanted to put the car in the hands of someone who I knew understood what I needed and would do the job right. Tony knows we aren't looking for a number to brag about or just a full-throttle tune to get me down a drag strip. It needs to drive smooth, be predictable at partial throttle and in transitions, and be reliable.

I had already been consulting with Tony on configuration details, tapping into his experience with tuning modern GMs so that the ECU would be happy with everything and give us the best shot at all my hard work translating into positive results. So I towed the car 300+ miles through 110° F Arizona summer to get Hyper in the right hands. With swamp coolers, temps in the shop were a humid ~90° F which is about worst case scenario for what we'd see on track.

Image


Hyper was on the dyno all day. Like, 9:30 AM to 9 PM. Lots of time spent on details, playing with cam timing, swapping things back and forth to see what worked best, different pulley sizes, etc.

Image


Now I know EVERYONE wants numbers, but that is going to remain confidential. I'm extremely happy with the results so far. I'm considering where we're at now 'stage 1', with two pulley sizes available dubbed "extra conservative" and "conservative". We're up against a fuel flow limitation on the current hardware with E85, so cannot run any more boost until we sort that further. Once we do, we can throw a tad more boost at it for a 'stage 2'.

I will say that I had been expecting a rather peaky setup with the Rotrex, going by what I am familiar with on BPs, but the setup has exceeded my expectations there - it retains a very flat torque curve similar to naturally aspirated, just with much more torque than before. Horsepower grows linearly with rpms with the largest gains up top, just like expected with the Rotrex. This is exactly what I was aiming for: all the good stuff about the engine package we have, just turned up a notch or two.

To avoid the pitchforks and riots I'll give this away:*we're currently putting better power and torque to the wheels than a Ferrari F430 on similar dyno.*

Since we have Miata Reunion @ Laguna Seca coming up where I'll need to run the big muffler, I have the alternate down-the-center rear exhaust on the car. One of the few times I get to hear it sounding more like a traditional V6:


Can't wait to get in the driver's seat and start shaking it down. First up is a local autocross this coming weekend where I can make sure nothing major is falling off the car and things are operating as expected, then I'll be scheduling some track testing time in the next few weeks.
 
#2,699 ·
So I did some autocrossy stuff just to shake things down and see what wants to fall off. The answer turned out to be absolutely nothing, ran flawlessly. It was pretty goofy trying to tip toe this thing around cones in a bumpy lot with it set up for the completely opposite end of the spectrum. Only a few short spots I could really use throttle but for those brief moments, oh man, it's moving.

Track testing this weekend. Much excite.

Image


Image
 
#2,700 ·
Oh yeah, almost forgot. Two years ago at Laguna Seca I was having trouble passing the 104db sound limits with the side exhaust. So last year I put together a Laguna Seca specific exhaust; entirely different config with downpipes going down the center tunnel and merging just behind the transmission, then 3" all the way out back, small resonator in the tunnel and then*the largest Magnaflow muffler I could find under the trunk space. I didn't end up going to Laguna Seca last year so I never got a chance to use it.

Image


Image


Image


Always improving:

Image


Local autocross is a strict 91 db limit, and with Miata Reunion right around the corner it was a good opportunity to make sure this exhaust was doing the job. No issues during the autocross. I daresay I could probably even run this car on a normal 92db sound limit day up there!

This config is obviously much heavier than the usual side exits, so those will be back for GTA Finals at Buttonwillow.
 
#2,701 ·
Got a shakedown in at Streets of Willow, working out some kinks and relearning the car. Even over weight with the Laguna Seca exhaust and a passenger I was thinking the car felt quick, drag racing with an Audio R10 down the straight, and then in a later session I switched over to a secondary page on the dash display and saw I was only making about half the boost I should've been.

Image


Worked out several other details while there, and towed home with a new top priority: find my boost!

Made some DIY caps for the intake piping so that I could pressurize the system and started the hunt. The primary issue was immediately obvious; there was a significant leak in the intercooler core itself. I couldn't put air in fast enough with the shop air to even build up any pressure.

Pulled the intercooler off the car and tested it alone, and found there were a dozen or so points in the core where pressure was leaking out between the bars significantly. So I had put a chunk of hours into building this custom intercooler, not knowing that the core was defective from the start. We suspect it was leaking less initially which is why it made pressure on the dyno, and then worsened after being bounced around and stressed. Not the news I wanted, but I was glad to have something in my hands that I knew was the cause (the worst part of an issue is not knowing the cause).

Image


I dove into making intercooler #2, and because we had seen super happy IATs with the first intercooler I decided to take this opportunity to use a smaller core for #2 to try to cut a few pounds. This time I used an off-the-shelf intercooler that already had endtanks to try to cut down on fabrication time a bit... but the inlet and outlet still had to be modified so it really didn't save much.

Image


Intercooler #2 held pressure perfectly:

Image


With the new intercooler in place I was able to pressure test the full system and pinpointed a few more smaller leaks. The seal between each coupler and pipe can be quite finicky. I'm using a combination of Murray clamps on the thin wall aluminum tubing and T bolts clamps on a couple of the thicker wall connections, like the outlet of the supercharger. The T-bolts actually deform the thin wall aluminum tubing, which I saw first hand on one of my pipes, so the Murray clamps are better in those locations, but they aren't without their finicky nature either. The one connection that never had any issues was the Vibrant HD clamp in the cold side piping. I also found a small leak in the blowoff valve fitting.

A quick side note, this highlights one of those inherent differences between turbos and superchargers that you don't really think about until you're dealing with it. A supercharger is far more sensitive to boost leaks than a turbo; up to a point, a turbo will compensate for leaks in the system by just spinning more until the wastegate sees the target boost achieved. A supercharger has no way to compensate, it spins exactly the same as it did without leaks, and any pressure lost to a leak is just lost. All in all, this was a good learning experience about how sensitive things can be to leaking, and I'm making pressure testing a routine step in the future any time anything in the charge pipe system is disassembled and reassembled.

Switching to fuel, at the track datalogs showed fuel was struggling a bit more than before. Then a few days later while idling in the shop the pump quit completely. Rather than swap in another Deatschwerks DW300, to be sure the low pressure side of the fuel system could supply anything we asked of it I decided to switch from a DW300 pump to a DW400. The DW400 is a big pump that doesn't really fit the Miata, but I modified the pump fixture and brackets to make it work. Then I redid the high current pump circuit with heavier gauge tefzel wire, larger fuse, etc. so that we can run the pump properly, even at the 20+ amps it draws at high pressure if needed.

Image


Image


Booked a local dyno to verify everything was sorted. Numbers didn't matter, just wanted the data logs from a few pulls. Everything is back in the green, but seeing 1.0-1.5 psi less now than in our first round of tuning at UMS, with a small but definite delay in the ramp up in boost when plotted by RPM.

Leading theory at the moment is that the smaller intercooler is causing a more significant pressure drop. To test this I'm going to add a second boost sensor in the hot side charge pipe so we can see the delta pre and post intercooler, and depending on what we find I might have a third intercooler build in my near future. We'll see.

But for now, it's running well and making decent power so it's buttoned up and going in the trailer tomorrow for Miata Reunion at Laguna Seca.

Image
 
#2,702 ·
Always love seeing updates, Ryan! :icon_cheers: Don't larger intercoolers typically cause more boost drop? Why do you think it is the opposite in this case?
 
#2,703 ·
I presume because it's more restrictive than the larger core?

Always love seeing progress on this build, this thread has been a massive inspiration to me over the years. I'm stoked to put front aero back on my car, but this time I have no rules to worry about (well, my class prohibits mechanical downforce so no skirts and blower motors) but otherwise.. no restrictions. It's going to be fun.

I hope the car ran well at Laguna!
 
#2,704 ·
Ryan, I don't have much to say. Just joined the club roadster forums. I've read through all 136 pages in the past two days. What started as a simple forum lurk session to gain insight and inspiration on my upcoming miata purchase.. turned into an edge of the seat, time/space warp of awesomeness. The code on my second monitor at work became meaningless.

The goal is to jump into motorsports at the absolute entry level. My heavier m3 with 5x the power would require way too much in consumables and quite frankly, is way too much car for me to make use of and drive at the limit on the track.

It's funny, I had never heard of or even seen your car before. Had no idea what lay ahead as the thread went on. To compare the beginning and the end is truly mind blowing.

Will stop myself here before I take up too much room on your thread. Absolutely fantastic read and surreal accomplishments. Biggest take away from me was (and I paraphrase):

"Spend less time/money on buying parts to make the car faster. The improvements to be made are usually between the steering wheel and the seat. Keep it simple and allow natural progression of skill take its course."